Today, I have written my first blog post for Threads.com. I am so happy because these are the people that have taught me to sew. As mention in my first post of this blog, Fashionable Beginnings, I have been using the Threads' Teach Me to Sew dvds and the Threads' YouTube video tutorials to teach myself to sew. These tutorials and dvds are so easy to follow. I have taught myself sew as well as perfected new sewing techniques by using Threads' tutorials. I am so grateful that felt that it is absolutely fitting to write a blog entry on Threads.com. This is a link to the blog post that I have written for Threads.com
Sew Wonderful to Finally Sew! - Threads
Friday, December 31, 2010
Power tools of Fashion
I love fashion design and sewing. Design comes to me naturally. However, sewing gives me the charge - that sensation that Tim "The Toolman" Taylor gets when he uses a power tool. When I am sewing, particularly when I get into a rhythm and pick up speed on the machine, I become hypnotized by the up and down motion of the needle I just love it! Right now, I own a Brother SE-270 Sewing and Embroidery machine. My favorite feature of this sewing machine is the thread cassette. It makes threading so much easier. I've not yet used the embroidery features of my sewing machine. However, I will begin teaching myself embroider, knit, and crochet after I have mastered sewing. I even considered learning how to make my own fabric on a loom.
Equipment of my Dreams
The Babylock Ellisimo has certainly piqued my interest. It is a beautiful sewing machine with a TrueView WVGA Color Touch Screen digital display, Nevermiss Automatic Needle Threader, Needle Cam, Stadium Lighting, Automatic Embroidery Poisitioning, and for computer geeks like me, three USB ports and a Mouse. Aesthetically speaking, it is gorrrrrrrrrrrgeous! Its metallic gold and white.
Image Source:Babylock.com
That is my dream machine. It's absolutely beautiful and I super want it!
After my dream machine, my favorite sewing tool is my 45mm Fiskars Rotary Cutter with the loop handle.
Image Source: Fiskars Rottary Cutter
Though, I talk about my dream machine, I have to give credit to my current sewing machine,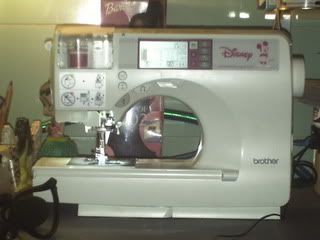
It is a Brother SE-270D Sewing & Embroidery Unit. I love it, because it has a thread cassette unit for automatic threading. It is pretty superb and it was under 500.00. I have made all of the sewing projects that I posted to this site with this machine. The next major power tool of fashion that I am going to buy is a serger. I will be discussing this in Part 2 of this article.
- Warita Winbush
Equipment of my Dreams
The Babylock Ellisimo has certainly piqued my interest. It is a beautiful sewing machine with a TrueView WVGA Color Touch Screen digital display, Nevermiss Automatic Needle Threader, Needle Cam, Stadium Lighting, Automatic Embroidery Poisitioning, and for computer geeks like me, three USB ports and a Mouse. Aesthetically speaking, it is gorrrrrrrrrrrgeous! Its metallic gold and white.

That is my dream machine. It's absolutely beautiful and I super want it!
After my dream machine, my favorite sewing tool is my 45mm Fiskars Rotary Cutter with the loop handle.

Though, I talk about my dream machine, I have to give credit to my current sewing machine,
It is a Brother SE-270D Sewing & Embroidery Unit. I love it, because it has a thread cassette unit for automatic threading. It is pretty superb and it was under 500.00. I have made all of the sewing projects that I posted to this site with this machine. The next major power tool of fashion that I am going to buy is a serger. I will be discussing this in Part 2 of this article.
- Warita Winbush
Monday, December 20, 2010
I made an Adult dress to wear in public!!!!!!!!!!!!!!!!!
I have have made my first adult dress that I would wear in public!!!!!!! I bought McCall's Pattern M6O73 sizez 18W - 20W- 22W-24W about 3 weeks ago.


V-Neckline
I am still trying to perfect the V-Neckline. I am going to make this dress again until I make V-Neckline in the back bodice of the dress correctly.
Elastic
This dress requires that Elastic be sewn in at the shoulders for gathering. The instructions direct to pull the elastic as tight as one can as one sews in the elastic. With this being my first time having done this, I stretched the elastic from one end towards me which cause the fabric not to feed forth and the thread to bunch. After looking for videos on YouTube about sewing in elastic, I learned that you have to stretch both ends of the elastic so the fabric and elastic will feed through.
Adjustments
I increased the patttern sized by 2, because I wanted to make sure that the dress didn't fit exact. To increase the pattern size, I traced the pattern onto wax paper using a permanent marker. This work perfectly because the permanent marker was soft enough not to tear the wax paper and it didn't easily smear either. Next, I measure the width of each size increase on the pattern, then I added two more in those areas. The areas of the pattern that did not show the size increase, I copied exactly. When choosing this method, one has to remember to center things such as a waistband that need to be center should the size be increased.

I used fabric bought from Wal-Mart 5 years ago. The finished product is beautiful!

From making this dress, I learned two new sewing skills! This dress has a V-Neckline on the back bodice and requires elastic to be sewn in at the shoulders and the waistband.
V-Neckline
I am still trying to perfect the V-Neckline. I am going to make this dress again until I make V-Neckline in the back bodice of the dress correctly.
Elastic
This dress requires that Elastic be sewn in at the shoulders for gathering. The instructions direct to pull the elastic as tight as one can as one sews in the elastic. With this being my first time having done this, I stretched the elastic from one end towards me which cause the fabric not to feed forth and the thread to bunch. After looking for videos on YouTube about sewing in elastic, I learned that you have to stretch both ends of the elastic so the fabric and elastic will feed through.
Adjustments
I increased the patttern sized by 2, because I wanted to make sure that the dress didn't fit exact. To increase the pattern size, I traced the pattern onto wax paper using a permanent marker. This work perfectly because the permanent marker was soft enough not to tear the wax paper and it didn't easily smear either. Next, I measure the width of each size increase on the pattern, then I added two more in those areas. The areas of the pattern that did not show the size increase, I copied exactly. When choosing this method, one has to remember to center things such as a waistband that need to be center should the size be increased.
Sunday, December 12, 2010
Near Perfection!
I have made Simplicity's It's So Easy: It's Simplicity pattern no. W2688 two more times. With the assistance of my lovely model Ree and her sister Mariah, my mom's doll, here are the finished products:

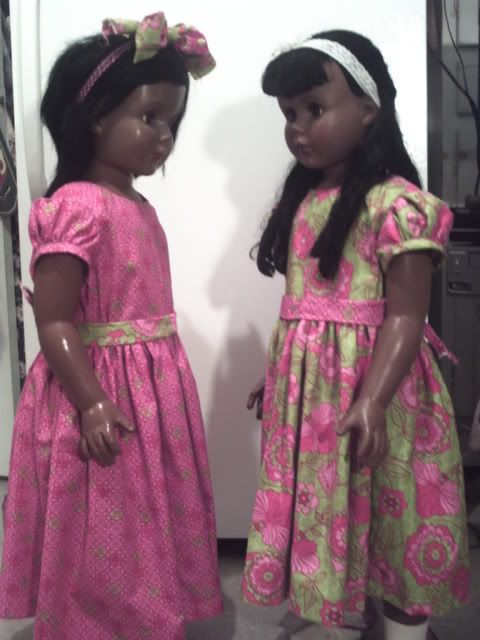
Ree & Mariah

Mariah & Ree
The Metamorphasis

Ree & Mariah
Mariah & Ree
The Metamorphasis
Facings
I finally nailed the facings. Initially, I followed the pattern instructions when attaching the neckline facing to the bodice. These instructions require that the facing be sewn in after the skirt is attached to the bodice. Using that method, I found that the facing kept rolling over the neckline edge. So, I watched the Threads' Teach Yourself to Sew Tutorials about facings. In the facings video, Judith Neukam explained that it's best to sew in the facings before you sew the side seams of the bodice and attach it to the skirt. Using Judith Neukam's instructions, I attached the facings and it was smooth sailing afterward.
Sleeve Bindings
My sleeve bindings came out so much better. I am still working on perfecting them. On Mariah's dress the left sleeve binding is narrower than the right sleeve binding as well as the sleeve bindings on Ree's dress.
Finishing edges
My goal is to work on finishing edges next. I am still trying to decide between finishing my edges with my sewing machine and finishing my edges with a serger.
Wednesday, December 1, 2010
My First Adult Dress !!!!
Well, as stated in my Sketching and Research post, my next project would be an adult dress. Well, here is the finished product!
In the Sketching and Research post, I was considering three methods by which to make the dress. These three methods were Combining a Skirt and Top to make a Dress, Designing a dress and creating my own original pattern, and Buy a Dress Pattern. The method that I chose to make the dress was method one, Combining a Skirt and Top to make a Dress. At first, I thought that it would be difficult and that I would mess up good fabric. However, I went tried it anyway. As the saying goes, nothing ventured- nothing gained. This venture turned out to be fruitful.
Fabric
The fabric that I chose isn't the most glamourous, however, I didn't want to mess up my favorite fabrics in an attempt to try a technique that I wasn't sure would work. I faced the stripes vertical because my shoulders are broad.
Design
The design is a combination of a top and skirt pattern from Simplicity's Khaliah Ali Collection pattern no. 4708. I bought this pattern at a local fabric store, Village Fabric. I combined top A and skirt D to create the dress by laying both pieces over the fabric with the top overlapping the skirt in just the right place. Pattern sizes are different from Ready to Wear sizes. Once I finished my dress, I found would like to have had a little more room in the dress. This is where knowing your measurements and adjusting your pattern to fit your measurements is a must. I will definitely do that with my next dress.
Afterthoughts
I love the style of the dress. It could have been roomier. Yes, I am sticking with I could have made it roomier,LOL. I made markings in the areas that I will adjust the pattern from now on. This dress was really, really simple to make. The Simplicity's It's So Easy: It's Simplicity pattern no. W2688 kicked my butt. However, it was worth it, because I learned how to gather, create at skirt and a bodice, create and attach sleeve bindings and facings, and I learned how to attach a zipper. Simplicity's Khaliah Ali Collection pattern no. 4708 was a breeze. My next adult outfit will come from this same pattern!
Subscribe to:
Posts (Atom)